The Petal Flow Pattern is soothing, rhythmic, and easy to draw — perfect for when you want to relax and let your pen move freely. It starts with a simple teardrop shape that gradually spreads into soft, flowing clusters — like petals opening in bloom.
Practice First
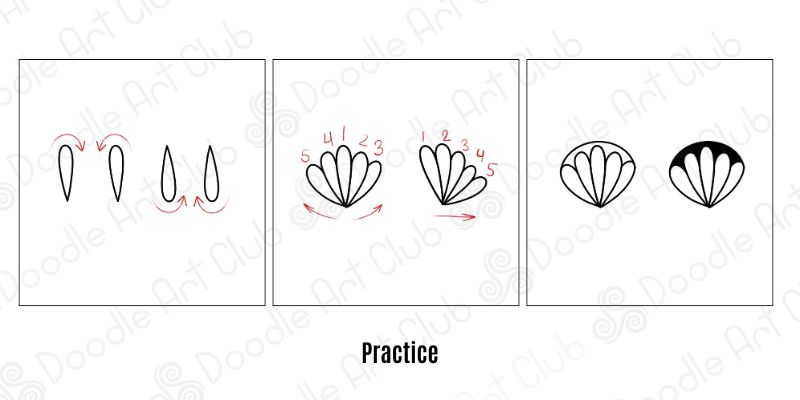
Before diving into the full pattern, warm up with these simple exercises:
P1: Practice the Shape
Begin by drawing a few elongated teardrops. Try both directions — top to bottom or bottom to top — and find the movement that feels most natural for your hand.
P2: Create a Bunch
Next, form your first petal bunch. Start with one teardrop in the center, then add more on each side (around 4–6 total), all meeting at the same base point.
You can also make your bunch one-sided, with all petals flowing in one direction — this creates a lovely sense of motion and energy in your drawing.
P3: Fill and Round
Once your bunch is complete, connect the tops of your petals with a gentle curved line and fill in the gaps. This step adds depth and gives your bunch a polished, full look — ready to flow across your page!
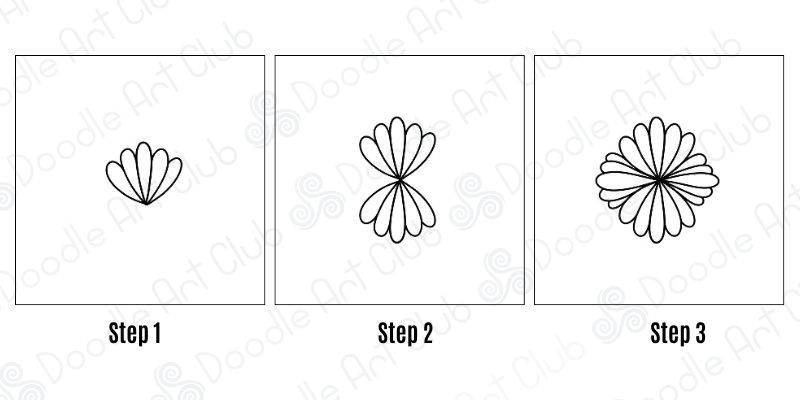
Step 1 – 3
Step 1: Draw your first small bunch of petals — 4–5 elongated teardrop shapes meeting at one base point.
Step 2: Add another bunch on the opposite side, mirroring the first one.
Step 3: Continue adding around the center until you create a complete flower shape.
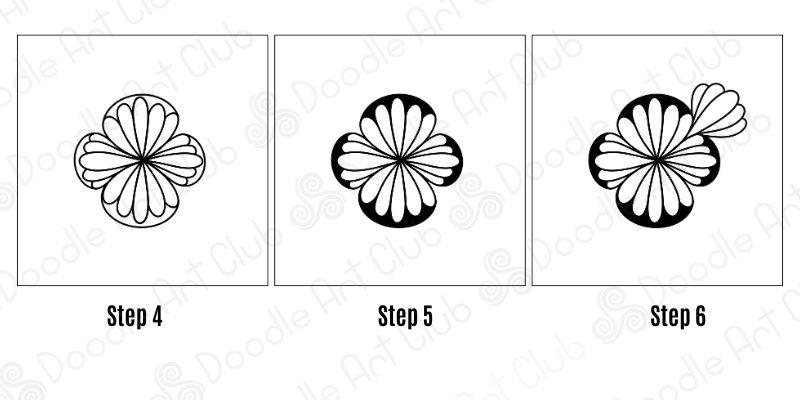
Step 4 – 6
Now your petals begin to flow outward.
Step 4: Extend your design by adding a few more bunches around the flower, keeping them close and slightly overlapping.
Step 5: Fill in some of the outer spaces with solid black to create contrast and make each cluster stand out.
Step 6: Add a new petal bunch branching off one side — this starts the signature “flow” of the pattern.
Steps 7 – 9
Step 6: Branch again. Add another one-sided bunch on the opposite side of your main bloom to start a gentle S-curve. Keep the bases aiming toward the center so the flow feels connected.
Step 7: Grow the cluster. Ring the main bloom with more bunches of mixed sizes. Let some overlap. Fill the outer negative shapes in solid black to carve a bold halo and separate petals.
Step 8: Separate & refine. Shape 2–3 satellite blooms around the main one. Leave thin white channels between black halos so each bloom reads clearly. Tweak petal lengths to round the silhouette.

Step 10 – 12
Watch your Petal Flow spread beautifully across the page.
Step 10: Keep layering bunches in gentle curves to form a larger, connected cluster.
Step 11: Add smaller bunches nearby to balance the composition.
Step 12: Finish by joining all sections so the petals appear to grow naturally across your page.

Variations
Experiment with color and contrast to bring your Petal Flow to life:
Warm Glow – Fill each petal with sunset tones — orange, red, and gold — to create a cozy, radiant look that feels full of warmth and energy.
Light on Dark – Try something new! Take a white gel pen or paint marker and draw your petals on black paper. The bright lines against the dark background create stunning contrast and make the pattern glow beautifully.
Soft Gradient – Use gentle shades of violet, amber, and blush to create a dreamy, delicate flow. Let the colors blend softly from one petal to the next for a calm, meditative feel..


